
Troubleshooting
- Reasons of Oil seal leak
-
-
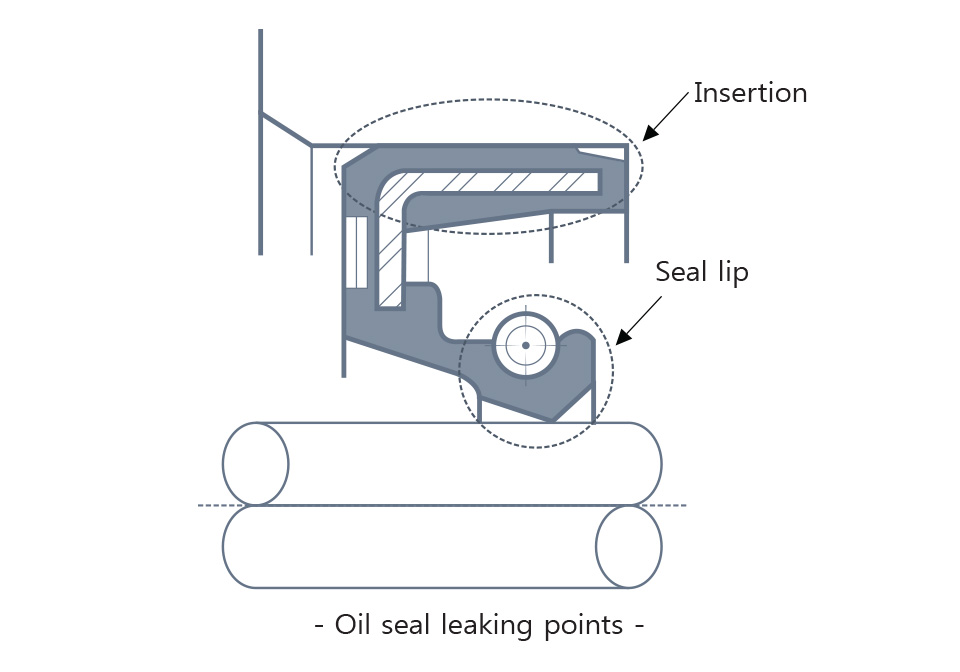
In the event of oil seal leak, check the area of leak first. The leak may not be from the oil seal. Or possibly other attached oil is mistaken as oil seal leak. Oil seal leak is divided into seal lip leak and insertion leak.
-
- Reasons of Lip leak
-
-
1. LIP excessive abrasion :Lubrication shortage, Foreign substance insertion, Huge internal pressure, Rough axis surface
-
2. LIP abrasion :Huge skewness, Skewed installation
-
3. LIP hardening :Abnormal high temperature, Huge internal pressure, Lubrication shortage
-
4. LIP softening :Inappropriate lip material
-
5. LIP damage :Poor assembly, Poor treatment, Poor axis chamfering, Foreign substance insertion
-
6. LIP important part damage :Poor assembly, Internal pressure excessive
-
7. LIP reverse :Poor axis chamfering, Poor assembly, Huge internal pressure
-
8. Spring fall-out :Poor axis chamfering, Poor assembly
-
9. No abnormality in Oil Seal :Axis damage, Axis direction, Excessive axis offcenter, Axis abrasion, Opposite treatment direction
-
10. Oil Seal transformation :Poor assembly
-
- Reasons of insertion leak
-
-
1. Oil Seal inclination :Small housing hole internal diameter, Housing poor chamfering, Inappropriate assembly tool
-
2. Oil Seal transform :Inappropriate assembly tool
-
3. No abnormality in Oil Seal :Housing hole internal damage, Housing hole rough surface treatment
-
4. Oil Seal outside surface scratch :Small housing hole internal diameter, Housing poor chamfering, Inappropriate assembly dimensions
-
- Lip leak (inside surface)
-
Reason Failure mode Reason Response LIP
Excessive
Abrasion
Lubrication
ShortageIip-end abrasion is huge and Abrasion side loses sheen. 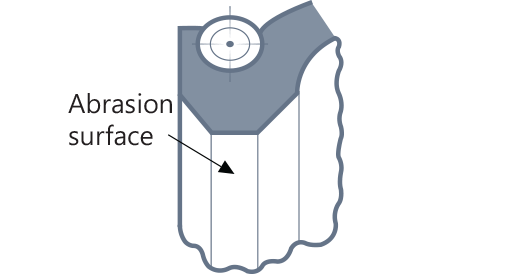
Lubricate is less than a set amount and does not reach lip, leaving lip operate in dry status. Abnormal abrasion occurs. Structure around oil seal is poor. Oil does not reach up to lip. (eg)
·Slinger is in front of seal lip.
·Seal lip has a huge drain in front. If spray lubricate is used, oil does not circulate at all for several minutes.Supply lubricate oil to a set amount before operation.
·Temporary response is to change to a double lip type and apply grease between the lips.
·Permanent response is to change the structure around oil seal and make oil flow through lip.Foreign
substanceLip-end abrasion is huge. There are lines or dinges. Line, dinge
An axis with attached cut residue or oil seal was used so cut power stuck inside. cut residue (dust) Oil seal was used on a dust-covered axis so the lip was affected. lip or axis was used with liquid gasket attached to affect the lip end. machine was painted and used with paint attached on its lip or axis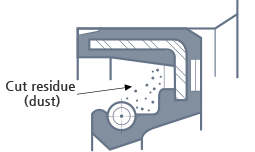
Assemble while preventing dust from being attached onto oil seal or axis. Wash the machine with the previously-used lubricate. Internal
pressure
大Lip-end abrasion is huge. There are dinges Abrasion surface, dinge
Oil seal pressure is over the designed level. Change to an internal pressure oil seal. Make an air hole (breather) to avoid pressure. Excessive
Surface
RoughnessLip-end abrasion is huge. There are circumferential lines on abrasion surface.
Abnormal abrasion because of using rougher axis than the set roughness of Rmax0.8~2.5μm. Change to axis surface roughness Rmax0.8~2.5μm and emery paper (about #240). Never move emery paper toward the axis. Replace with an axis of the set roughness. LIP
One-sided
AbrasionTreatment
Offcenter
is largerLip operation width is not circumferentially even. Min width and max width are in almost Symmetrical locations. One-sided abrasion
Axis and housing centers are off when assembled and operated. Increase axis and housing concentric levels. Axis was bent toward one side in operation. Reinforce axis resistance against bending. Tilt and
installLip operation width is not even circumferentially. Min width and max width are in almost symmetrical locations. seal lip and dust lip operation width sizes are reversed.
Housing internal diameter is smaller than the set size. The oil seal was excessively forced into to be skewed and inserted. Use a housing in set standards. Housing chamfering was not performed or not performed properly. Or he oil seal was excessively forced into to be skewed and inserted. Perform housing chamfering or make an appropriate dimension. Assembly toll is tilted to make installation skewed. Improve assembly fixture. LIP
HardeningAbnormal
high
temperatureLip operation part is soft and sheenful. The whole lip is hardened with lip cracks.
Seal lip oil temperature rose for come reason beyond the rubber heat resistance limit. Find the reason and prevent temperature rise. The condition reaches the upper limit in design or so to raise oil temperature and move beyond heat resistance limit. Change to an oil seal with high heat-resistive lip material. (eg) nitrile rubber →acryl rubber (NBR) (ACM) acryl rubber →fluorine rubber (ACM) (NBR) ( lip material change should be carefully performed as it is related to oil resistance. ) Internal
pressure
大Lip operation width is wide, sheenful and has lip cracks. Pressure exceeds the oil seal pressure-resistance limit. Change to a pressure-resistive oil seal . Design air hole to avoid pressure. Lubrication
shortageLip operation is soft, sheenful and lip operation surface has cracks or become cracked if pressed with fingers. Frequently, only the operation side is hardened. Lubricate oil is used in excessive of the set amount to leave less for lip, causing lubrication shortage. Supply lubrication up to the set amount before operation. Insufficient spray lubricate flow in lip, causing lubrication shortage Temporary response is to change to a dust lip type and apply grease between lips. Permanent response is to change the structure around oil seal to supply sufficient oil to lip. LIP
softeningLip
materialLip swells and becomes soft. Lubrication lip material was chosen wrongly to expand lip. Change to a lip material oil seal that does not swell in relation to lubrication. Change to an oil that does not swell lip material. Sedimentation in cleansing oil or gasoline or left untreated with cleansing liquid being attached after cleaning to cause expansion Do not wash oil seal. LIP
damagePoor
assemblyLip-end has visible scratch. Oil seal contacted with sharp edge when passing through key groove or sp lines to be scratched. Cover key groove or spline with cap, etc., to avoid scratch. Oil seal was installed with burr, etc. being attached on axis chamfering part to cause scratch. Remove burr, etc. Poor
treatmentLip end was damaged by a sharp metal part during oil seal transportation or storage. Improve storage/transportation method. Handle oil seal with cut powder-covered gloves on to damage lip end. Do not touch lip end. poor
axis
chamfer
ingLip-end has visible scratch. Axis-end chamfering dimensions and angle are not precise. So lip was scratched by the end of axis. Keep axis chamfering at an appropriate level. foreign substance Lip-end has foreign substances. Lip operation has dinge. Cut powder-covered axis was used and cut power fell on to lip end. Metal powder-covered parts were used and metal powder was embedded into lip end. axis or oil seal were left in serious dust for a long time before used to fall foreign substance into lip end. Clean the machine. LIP
twistpoor axis chamfering Lip is twisted to the reverse side to the proper oil seal axis insertion direction. Axis end chamfering dimensions and angle are not appropriate to turn around lip as lip end is caught by axis end. Adjust axis chamfering dimensions and angle appropriately. Apply grease onto chamfering during assembly. Poor assembly Axis and housing centers were not met during assembly to twist lip. Align axis and housing hole centers together and assemble with special attention. Apply grease at axis end as well. Internal
pressure
大Part or whole of lip circumference is twisted to the outside.
Abnormal high pressure during operation to apply huge force onto ip part and twist lip. Improve the structure to avoid pressure. Use a pressure-resistive oil seal. LIP
Impo
RtAnt
part
damagePoor
assemblyLip important part is cracked.
Lip was dented in assembly to crack. Align axis and housing hole centers together and assemble with special attention. Internal
pressure
excessiveIn post-assembly pressure test (classified test), excessive pressure was applied to crack 요부. Do not test with pressure stronger than the pressure-resistance of oil seal. In operation, higher pressure was generated than design expectation to crack. Change to a pressure-resistive oil seal Change to a structure causing no excessive pressure. Spring
missingAxis
poor
chamferingSpring is missing partially or entirely. Transformation Axis-end chamfering dimensions and angle are inappropriate so spring was missed out by being caught at axis end. Adjust axis chamfering dimensions and angle. Apply grease on to chamfering and assembly poor assembly In assembly, axis and housing hole centers were not aligned together and disarranged during assembly to miss out spring. Align axis and housing hole centers and assemble with special attention. Apply grease at axis end as well. Oil seal
transformPoor
assemblyOil seal is transformed and transformation lip operation width is changed.
Oil seal assembly fixture was inappropriate to transform oil seal. Improve assembly fixture. No
abnormality
in oil sealAxis
scratch- Axis operation part has visible scratch. Insert buttress into oil seal and relocate operation Change and re-process the damaged part. Axis
direction- I used literally turning axis Change axis lip operation part only with emery paper(#240) without causing a scratch. In molding process, polisher (grinder), emery paper made a scratch. Change a processing method. (to a method not to scratch the axis direction) Axis
offcenter- Bearing abnormality increased axis offcenter larger than the designed limit. Change bearing. Machine axis offcenter is large but the used oil seal is for general purposes. Change an offcenter-resistive special oil seal. Axis
abrasion- Installed an oil seal with dust, and cutting powder. Lubricate deterioration, foreign substance mixture, and external foreign substances got into lip operation part. Clean the machine. Buttress oil seal in assembly and remove operation part. In the case of small dust, use an oil seal with dust lip or attach a dust cover. Nonferrous was used in axis. Use a proper axis material. Opposite
treatment
direction- Wrong installation during assembly Direct seal lip toward the sealing target. 
- Insertion leak (outside surface)
-
Reason Failure mode Reason Response Installation
tilted[Before taking out oil seal]
Oil seal tilting is identified in housing and axis.
[After taking out oil seal]
Oil seal insertion part is uneven.Housing hole dimensions are smaller than the set dimensions. So oil seal was forced in to be tilted in installation. Change to the set housing hole internal diameters. Housing hole chamfering was not done or inappropriate. Oil seal was forced in to be tilted in installation. Do housing hole chamfering or change to an appropriate dimension. Assembly fixture is tilted to result in skewed installation. Improve assembly fixture. Trans
formationInsertion scratch is locally disconnected. 
Oil seal assembly fixture was inappropriate and transformed oil seal. Improve assembly fixture. Insertion part is cracked by assembling oil seal that caused local transformation while handling. Try not to drop or be hit by something hard while handling. Insertion
scratch
/
Torn-out[After taking out oil seal] Oil seal insertion has damage to axis direction or rubber is torn out. Housing hole internal diameter is smaller than the set size. So oil seal was forced in to be tilted in installation and damage the insertion part. Change housing hole internal diameter to a set size. Housing hole chamfering was not done or inappropriate. Oil seal was forced in to damage Change housing hole internal diameter to a set size. Perform housing hole chamfering or change to an appropriate size. Oil seal assembly fixture and housing were not in parallel in oil seal installation to damage oil seal insertion. Adjust oil seal assembly fixture and housing to be in parallel. No abnormality in oil seal -
Housing hole inside or oil seal insertion was covered with foreign substances such as cutting powder when used for oil seal installation to damage housing hole internally. oil seal was assembled and separated several times to damage housing hole internally Huge damage inside housing hole. Apply thin liquid gasket to make up for the internal housing hole damage. Try not to get the liquid gasket onto seal lip or axis. Housing hole Surface treatment burr was not removed in installation to scratch inside housing hole. Take out oil seal and check for ay burr on housing hole chamfering part. If there is burr, remove with emery paper and apply liquid gasket inside housing hole. - Housing hole internal roughness is excessive. -Temporary response is to apply liquid gasket inside housing hole.
-Permanent response is to adjust housing hole internal thickness to an appropriate level.
- Examples of Oil seal leak and mistake
-
-
1. Machine joint surface leak
- Gasket permanent transformation
- Loose bolt
- Assembly part damage
- 2. Machine body, cover part cracks; casting leak
- 3. Oil seal or housing surface oil attachment during assembly
- 4. Oil seal initial lubricate leak
-
1. Machine joint surface leak
- Gasket permanent transformation